BIOS - ChipI tried to do a BIOS update from Windows. Flashing finished without an error so I decided to reboot. The tablet shut down and… never turned on again. Nothing of what I tried had any effect, the tablet remained dead. Not A sign of life. So I decided the BIOS flash must have gone wrong. What now?

After some research I found that there were more people with the same problem, and some seemed to have successfully flashed their BIOS again. So I decided to give it a try.

First of all I needed some hardware. I searched online for a BIOS programmer, and found a cheap CH314A programmer that should do the job. It had TTL and 3.3V levels, I knew that the BIOS chip was 3.3V so it should work without frying my BIOS chip.

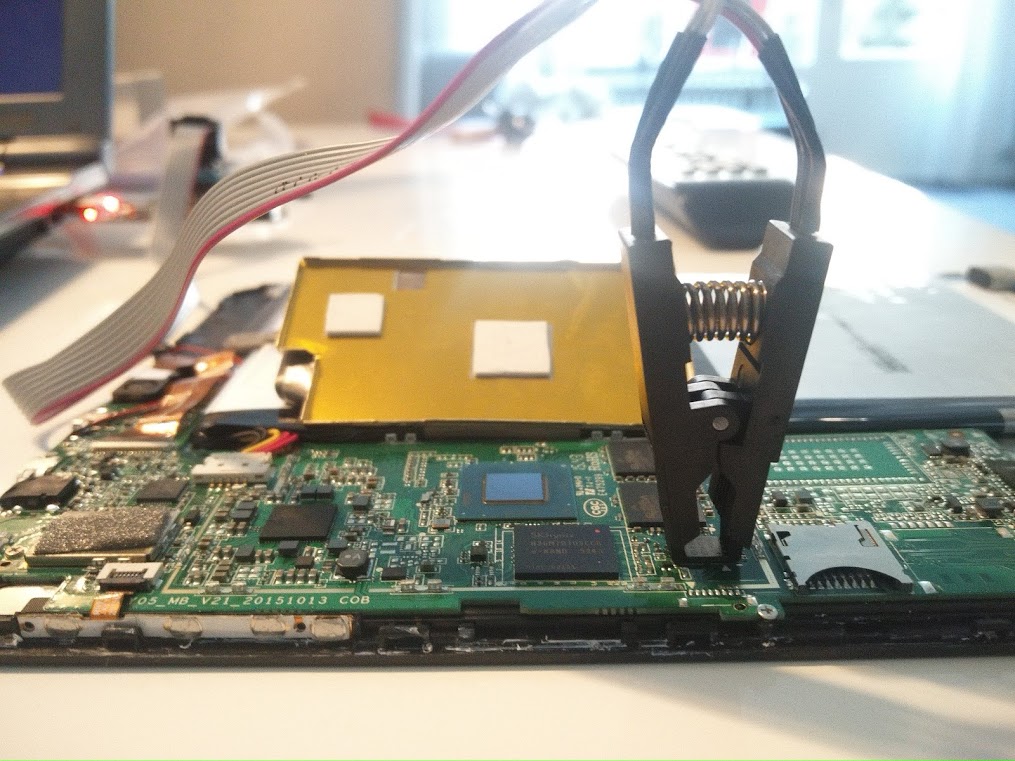
Next step was to find a way to program the chip without soldering. I knew that the chip was in SOP8 package, so I searched a test adapter for a SOP8 chip, and ordered one.

After about a week the hardware was in, and I could get to work. I found the correct BIOS and found a bin file in the download. Then I installed flashrom and connected all the hardware together.
BIOS - Tablet and laptop BIOS - Adapter

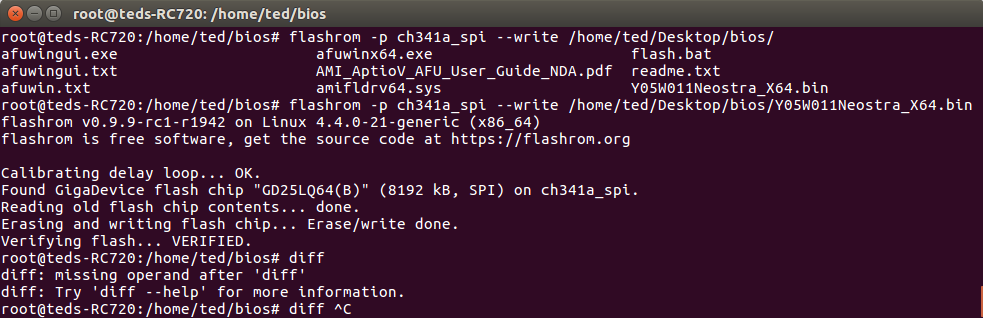
First I made a backup of the current rom using flashrom:
flashrom -p ch341a_spi --read backup.bin

After the backup it was time to flash:
Screenshot from flashrom

After this, I disconnected the test adapter, disconnected the battery, reconnected the battery and tried to boot. And with success, the tablet booted straight up to Windows!

I wanted to flash a custom firmware on an HTC Desire S because I didn’t like the Sense interface HTC installed on the device. It felt sluggish and I think it was ugly.

CyanogenMod logoI have unlocked the bootloader on htcdev.com, rooted the device, and installed ClockworkMod (cwm). I chose a rom that seemed usefull (in this case CyanogenMod), and copied the cwm image (.zip file) to my sd-card, and booted into recovery. Here I made a backup of the current rom, did a full wipe, and flashed the image. After this I rebooted the device, expecting to see my new rom boot.
Instead of booting, all I saw was a white screen with the letters HTC in green on an white background. This state is named bootloop.
After flashing back the original rom, the device booted without problems.

I have tried several roms, all with exacly the same problem. After a lot of online research i have finally a booting custom rom. The solution was to flash the correct boot.img file for your rom to the device with the fastboot utility. The file boot.img is in the .zip file of the rom you chose. Flashing the boot.img can be done this way:

  1. Boot the HTC in fastboot mode by powering on the device while holding the Volume – button, and choosing fastboot
  2. Connect the phone to your computer with an micro-USB cable
  3. Flash the boot.img you extracted from the custom firmware:

    fastboot flash boot <path to boot.img>

  4. Reboot the phone

After these steps your HTC Desire S should boot the custom rom as expected!